
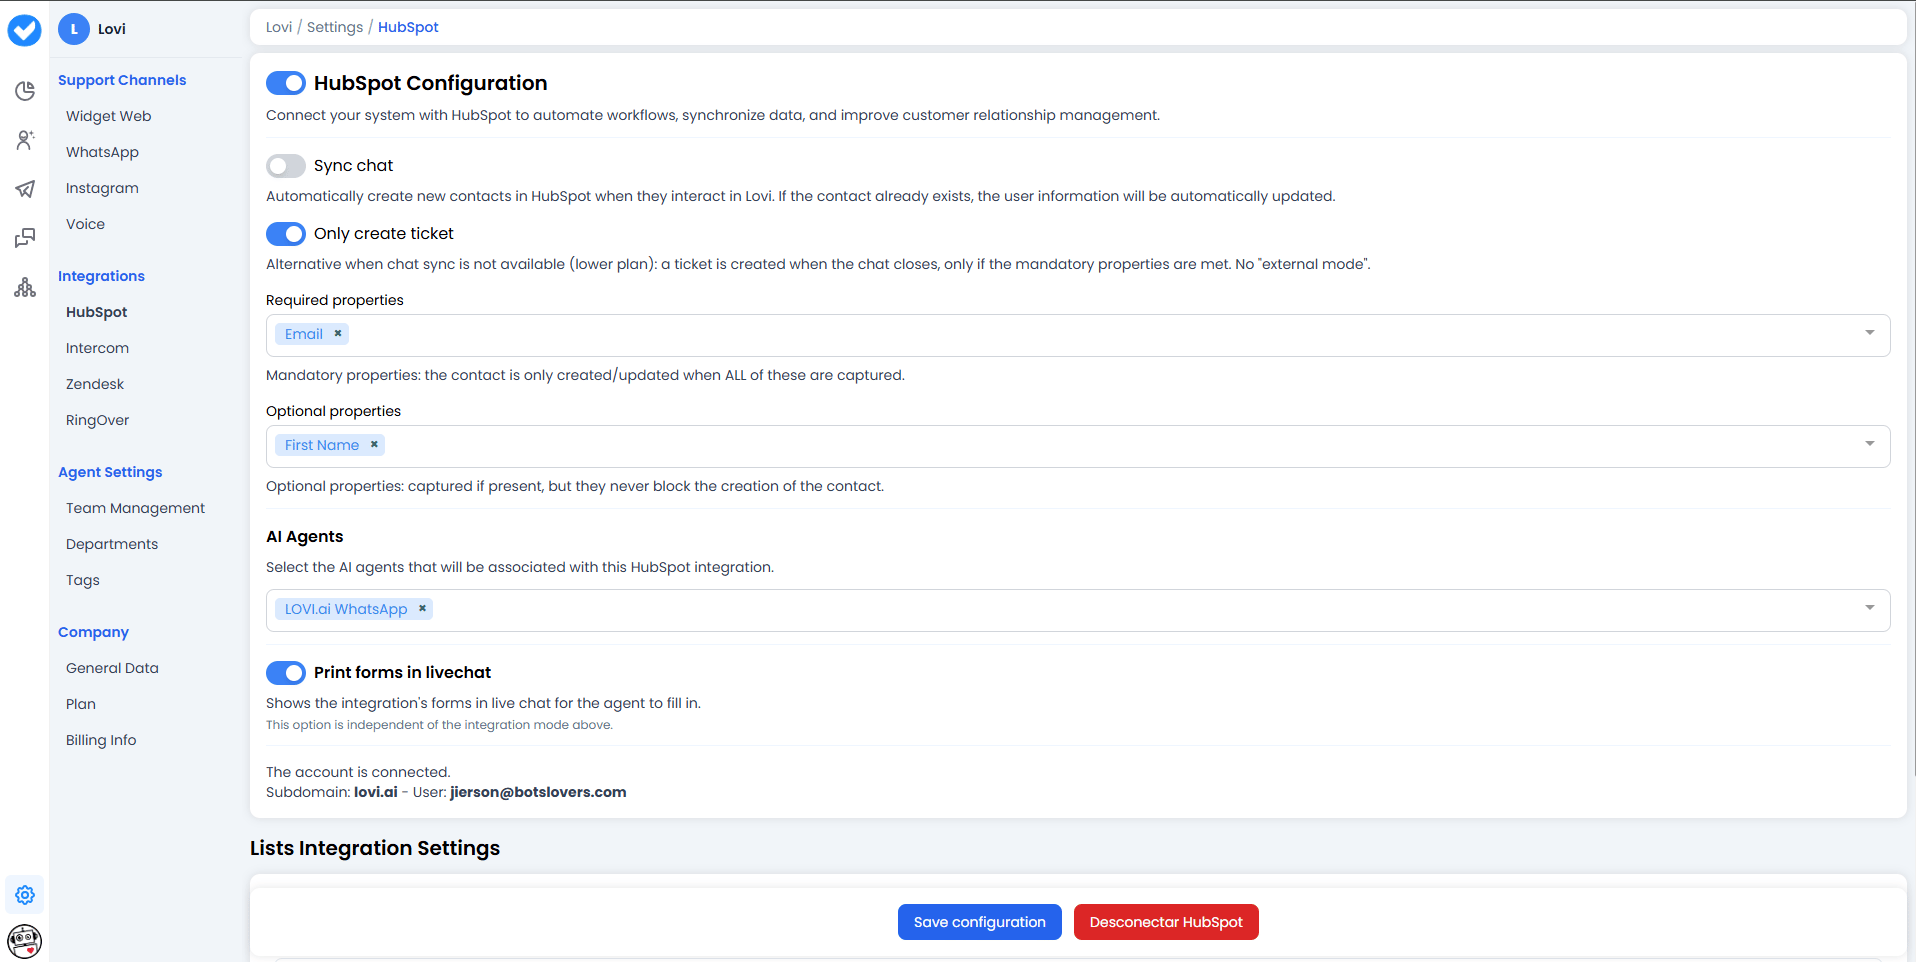
🔌 1. HubSpot Configuration
The top toggle enables or disables the entire HubSpot integration. Once you authenticate with your HubSpot account, you’ll see several options that control how your data is synchronised.A. Sync Chat (Contact Synchronisation) 🔄
- What does it do? It’s your automatic assistant. Every time a user talks to your AI Agent in Lovi, the system looks for that contact in HubSpot.
- If it doesn’t exist: It creates it automatically.
- If it already exists: It updates the contact with any new information from the conversation.
- Benefit: Forget manual data entry. Your CRM stays up to date with every lead captured by the bot.
B. Only Create Ticket 🎫
An alternative when chat sync is not available (e.g. on a lower plan). When this option is enabled:- A ticket is created in HubSpot when the chat closes, but only if the mandatory properties have been captured during the conversation.
- There is no “external mode” — the ticket is created based on the data collected by the AI Agent inside Lovi.
- When to use it: If your plan does not include full chat synchronisation, this is the way to still push conversation outcomes into HubSpot.
📝 2. Properties
Properties define the data the AI Agent must collect during the conversation before a contact or ticket can be created in HubSpot. They are split into two categories:Required Properties ✅
These are mandatory. The contact or ticket is only created or updated in HubSpot when all required properties have been captured.- Examples: Email, Phone Number.
- Use the dropdown to add or remove required properties.
Optional Properties ➕
These are captured if present during the conversation, but they never block the creation of the contact or ticket.- Examples: First Name, Last Name, Address.
- Use the dropdown to add or remove optional properties.
🤖 3. AI Agents
Select which AI agents will be associated with this HubSpot integration.- Use the dropdown to pick one or more agents (e.g.
LOVI.ai WhatsApp). - Only conversations handled by the selected agents will trigger contact creation, ticket creation, or data synchronisation in HubSpot.
- This is useful when you have multiple agents and only want certain ones to feed data into HubSpot.
💬 4. Print Forms in Livechat
When enabled, this toggle shows the integration’s forms directly in the live chat interface so the human agent can fill them in manually.- This option is independent of the integration mode (Sync Chat or Only Create Ticket).
- Use case: If a human agent takes over a conversation, they can see and complete the required/optional property fields right inside the live chat panel, ensuring no data is missed before the conversation is synced to HubSpot.
🔗 5. Connection Status
At the bottom of the configuration section you’ll see the connection details:- “The account is connected” — Confirmation that the integration is active. ✅
- Subdomain: The HubSpot subdomain linked to the integration (e.g.
lovi.ai). - User: The HubSpot user email that authorised the connection.
📋 6. Lists Integration Settings
This is the powerful part. Here you connect your HubSpot contact lists with Lovi’s WhatsApp channels to send targeted notifications. The goal is to tell the system: “When we use THIS HubSpot contact list, send messages using THIS WhatsApp number and THIS template.”Adding a New List
- Click + Add list to open the new list configuration form.
-
HubSpot list: Type the name of a list you’ve already created in HubSpot (e.g.
Lista De Prueba). A dropdown will appear with matching results. - Select the list and click Apply.
-
Once the list is applied, a dedicated configuration block will appear. Here you define the rules for those contacts:
- WhatsApp phone number (Line): Choose the phone number messages will be sent from.
- WhatsApp template: Define which pre-approved template will be used to reach this list (e.g.
hello_world). - Variables: If the template contains variables, map them to the appropriate contact properties.
Managing Existing Lists
Each configured list shows its details (line, template, variables) and offers three actions:- Complete: Mark the list configuration as finalised. A green badge confirms it is ready.
- Edit: Modify the list’s phone number, template, or variable mappings.
- Delete: Remove the list configuration entirely.
Note: Changes to list configurations are only persisted when you click Save configuration at the bottom of the page.
💾 7. Save Configuration
Once you’ve configured your toggles, properties, agents, and lists, click Save configuration to apply all changes.🎯 What is this actually for?
By setting this up, you unlock two superpowers:- Inbound: Everyone who talks to the bot is automatically saved in HubSpot (via
Sync Chat) or a ticket is created when the chat closes (viaOnly Create Ticket), depending on your plan and preference. - Outbound: You prepare the ground to launch campaigns or automations to your HubSpot lists using Lovi’s WhatsApp infrastructure, ensuring each segment receives the right message from the right number.