> ## Documentation Index
> Fetch the complete documentation index at: https://docs.lovi.ai/llms.txt
> Use this file to discover all available pages before exploring further.
# AI Agents
> Manage your conversational AI assistants and create new ones with the guided onboarding wizard.
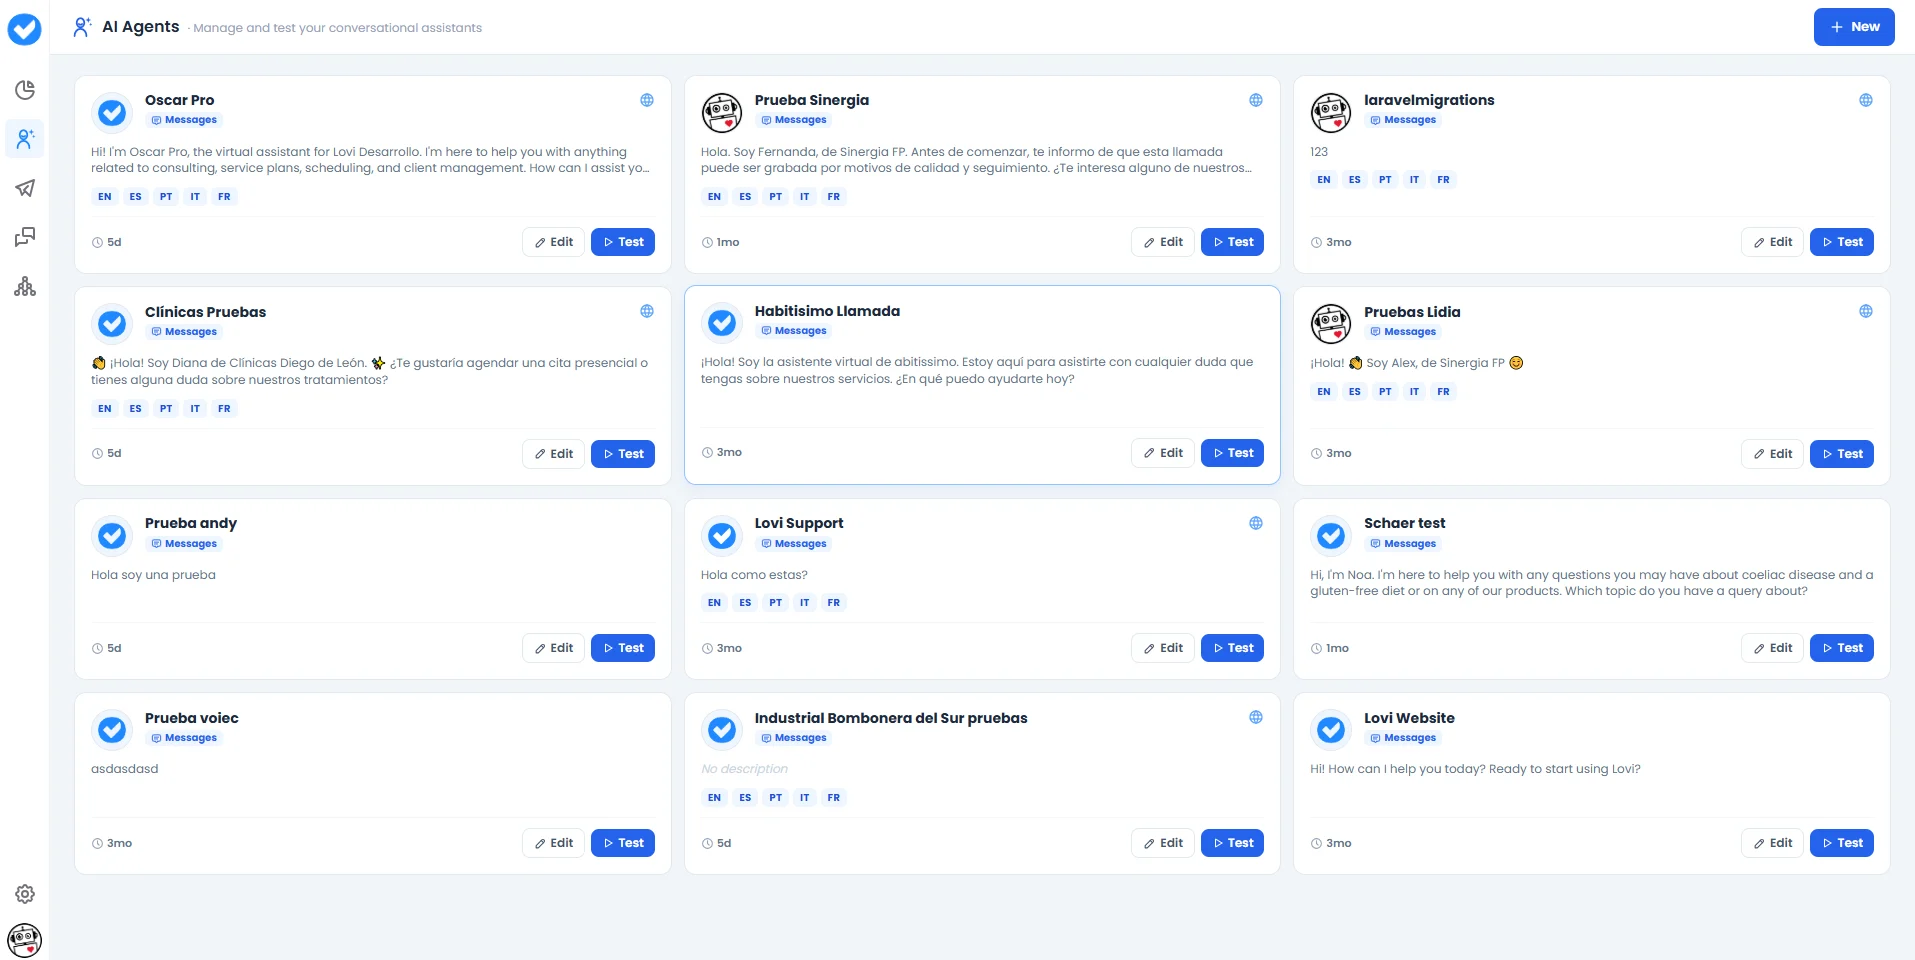 Welcome to **AI Agents** — your command centre for every conversational assistant in your account. Here you can see all your agents at a glance, edit them, test them, and create brand-new ones.
Each card on the dashboard shows you the essentials: the agent's **name**, its **channel type** (Messages), a snippet of its **greeting**, the **languages** it supports, and how long ago it was last updated. On every card you'll find two quick actions:
* **Edit:** Jump straight into the full agent configuration (Engine, Guardrails, Voice, etc.).
* **Test:** Open the Playground to try the agent in real time before going live.
***
### 🆕 Creating a New Agent
Click the **+ New** button in the top-right corner to launch the creation wizard. It's a short, guided onboarding that will have your agent ready in minutes.
***
#### Step 1: Choose Interaction Type
Welcome to **AI Agents** — your command centre for every conversational assistant in your account. Here you can see all your agents at a glance, edit them, test them, and create brand-new ones.
Each card on the dashboard shows you the essentials: the agent's **name**, its **channel type** (Messages), a snippet of its **greeting**, the **languages** it supports, and how long ago it was last updated. On every card you'll find two quick actions:
* **Edit:** Jump straight into the full agent configuration (Engine, Guardrails, Voice, etc.).
* **Test:** Open the Playground to try the agent in real time before going live.
***
### 🆕 Creating a New Agent
Click the **+ New** button in the top-right corner to launch the creation wizard. It's a short, guided onboarding that will have your agent ready in minutes.
***
#### Step 1: Choose Interaction Type
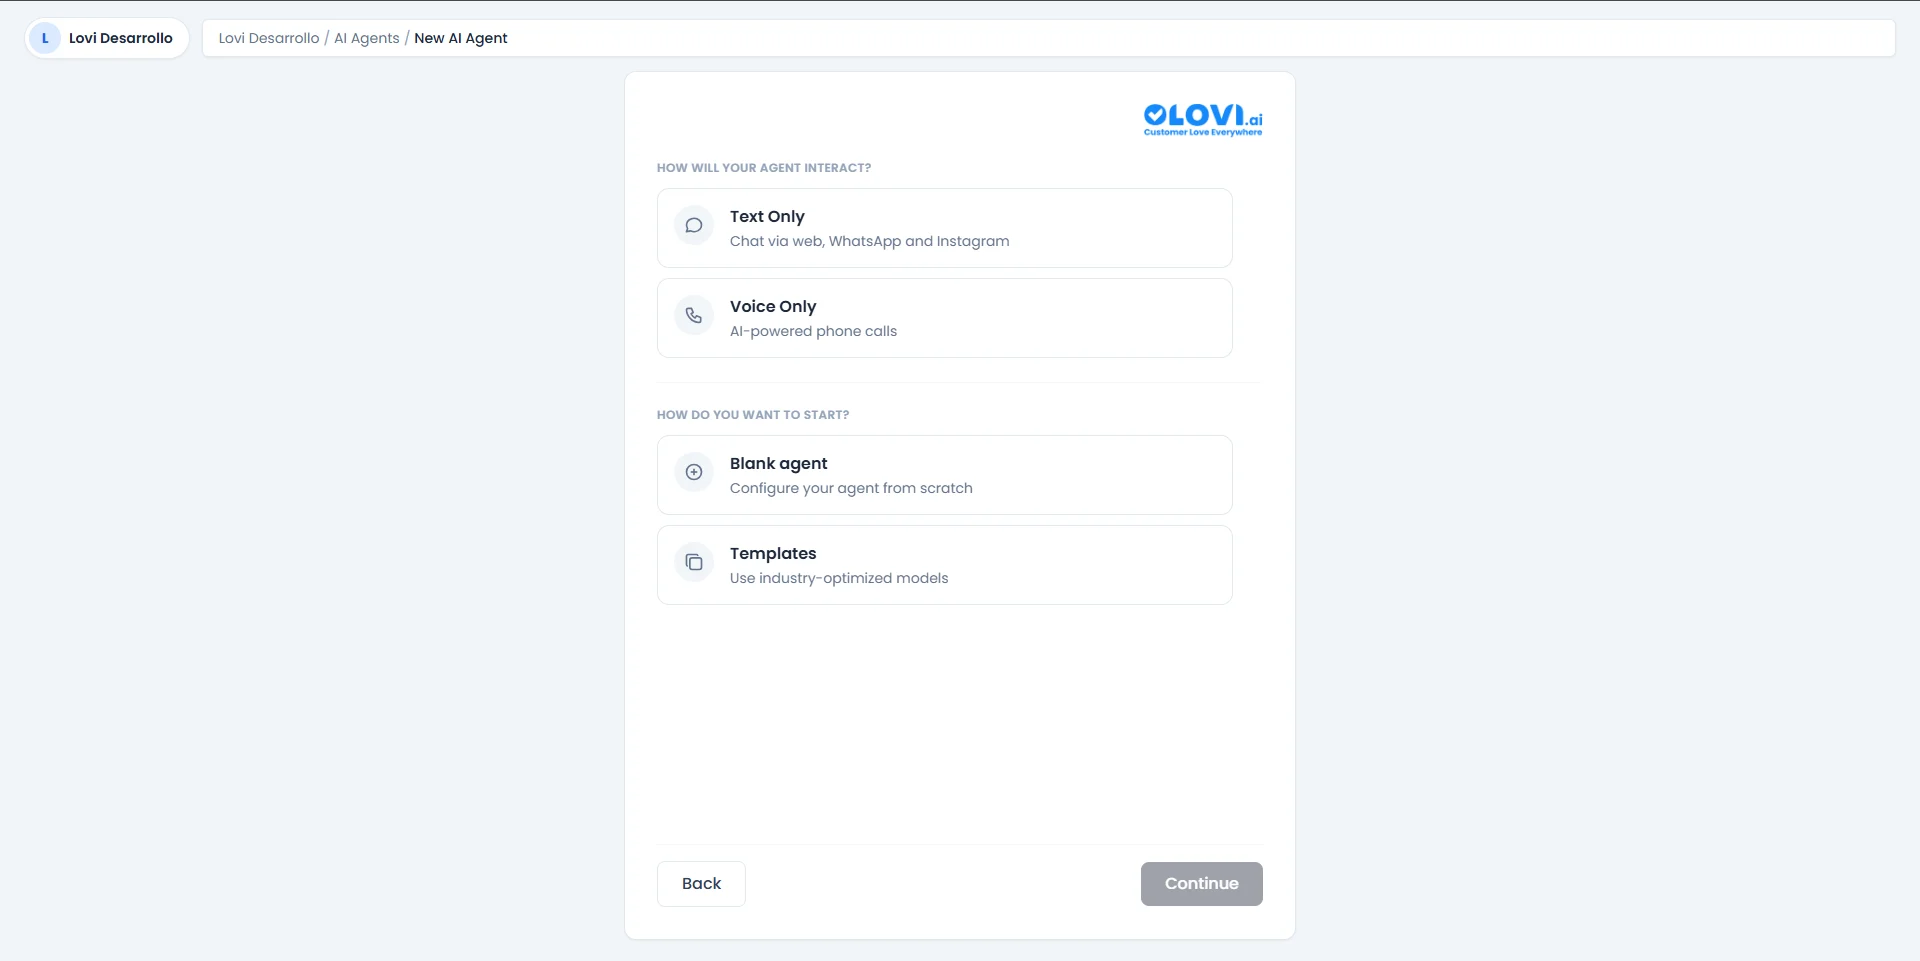 First, decide **how your agent will interact** with customers:
| Option | Description |
| :------------- | :-------------------------------------------------------------------------------------------------------------------------- |
| **Text Only** | Chat via web widget, WhatsApp, and Instagram. Perfect for written customer support, lead qualification, and FAQ automation. |
| **Voice Only** | AI-powered phone calls. Ideal for telephone support lines, appointment booking, and outbound voice campaigns. |
Then, choose **how you want to start**:
| Option | Description |
| :-------------- | :------------------------------------------------------------------------------------------------------------------------- |
| **Blank agent** | Start from scratch. You'll configure every detail yourself — maximum flexibility. |
| **Templates** | Use industry-optimised models. The wizard will guide you through a few more steps to tailor the template to your business. |
Click **Continue** to proceed.
***
#### Path A: Blank Agent
If you chose **Blank agent**, you'll go straight to the configuration screen:
First, decide **how your agent will interact** with customers:
| Option | Description |
| :------------- | :-------------------------------------------------------------------------------------------------------------------------- |
| **Text Only** | Chat via web widget, WhatsApp, and Instagram. Perfect for written customer support, lead qualification, and FAQ automation. |
| **Voice Only** | AI-powered phone calls. Ideal for telephone support lines, appointment booking, and outbound voice campaigns. |
Then, choose **how you want to start**:
| Option | Description |
| :-------------- | :------------------------------------------------------------------------------------------------------------------------- |
| **Blank agent** | Start from scratch. You'll configure every detail yourself — maximum flexibility. |
| **Templates** | Use industry-optimised models. The wizard will guide you through a few more steps to tailor the template to your business. |
Click **Continue** to proceed.
***
#### Path A: Blank Agent
If you chose **Blank agent**, you'll go straight to the configuration screen:
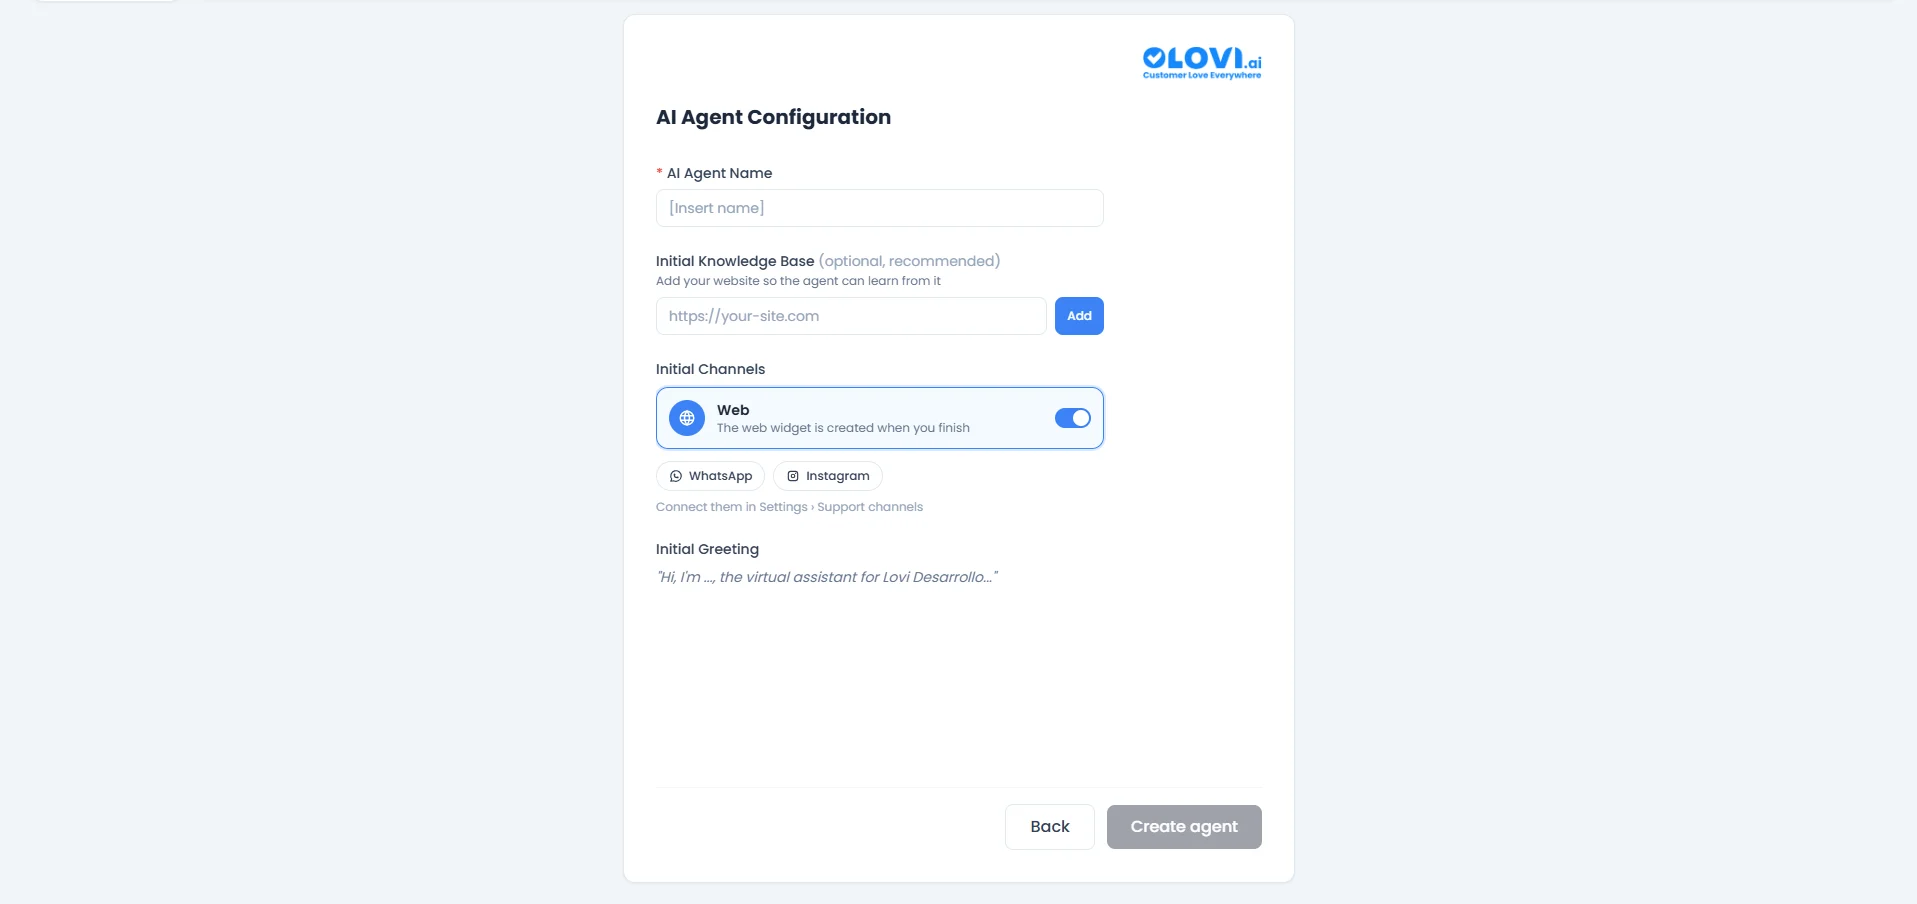 Fill in the following fields:
* **AI Agent Name** (required): Give your agent a recognisable name (e.g. `Support Bot`, `Sales Assistant`).
* **Initial Knowledge Base** (optional, recommended): Paste your website URL so the agent can learn from it right away. Click **Add** to include it.
* **Initial Channels:** Toggle which channels the agent should be active on:
* **Web** — Enabled by default. A web widget is automatically created when you finish.
* **WhatsApp** / **Instagram** — Shown as available but need to be connected first in *Settings > Support Channels*.
* **Initial Greeting:** A pre-filled greeting message that will be shown to customers when a conversation starts (e.g. *"Hi, I'm ..., the virtual assistant for Your Company..."*).
Once you're happy, click **Create agent** and you'll be taken to the full configuration module.
***
#### Path B: Templates (Industry-Optimised)
If you chose **Templates**, the wizard walks you through three quick steps to tailor the template to your business.
##### Step 2 of 3: Select Your Sector
Fill in the following fields:
* **AI Agent Name** (required): Give your agent a recognisable name (e.g. `Support Bot`, `Sales Assistant`).
* **Initial Knowledge Base** (optional, recommended): Paste your website URL so the agent can learn from it right away. Click **Add** to include it.
* **Initial Channels:** Toggle which channels the agent should be active on:
* **Web** — Enabled by default. A web widget is automatically created when you finish.
* **WhatsApp** / **Instagram** — Shown as available but need to be connected first in *Settings > Support Channels*.
* **Initial Greeting:** A pre-filled greeting message that will be shown to customers when a conversation starts (e.g. *"Hi, I'm ..., the virtual assistant for Your Company..."*).
Once you're happy, click **Create agent** and you'll be taken to the full configuration module.
***
#### Path B: Templates (Industry-Optimised)
If you chose **Templates**, the wizard walks you through three quick steps to tailor the template to your business.
##### Step 2 of 3: Select Your Sector
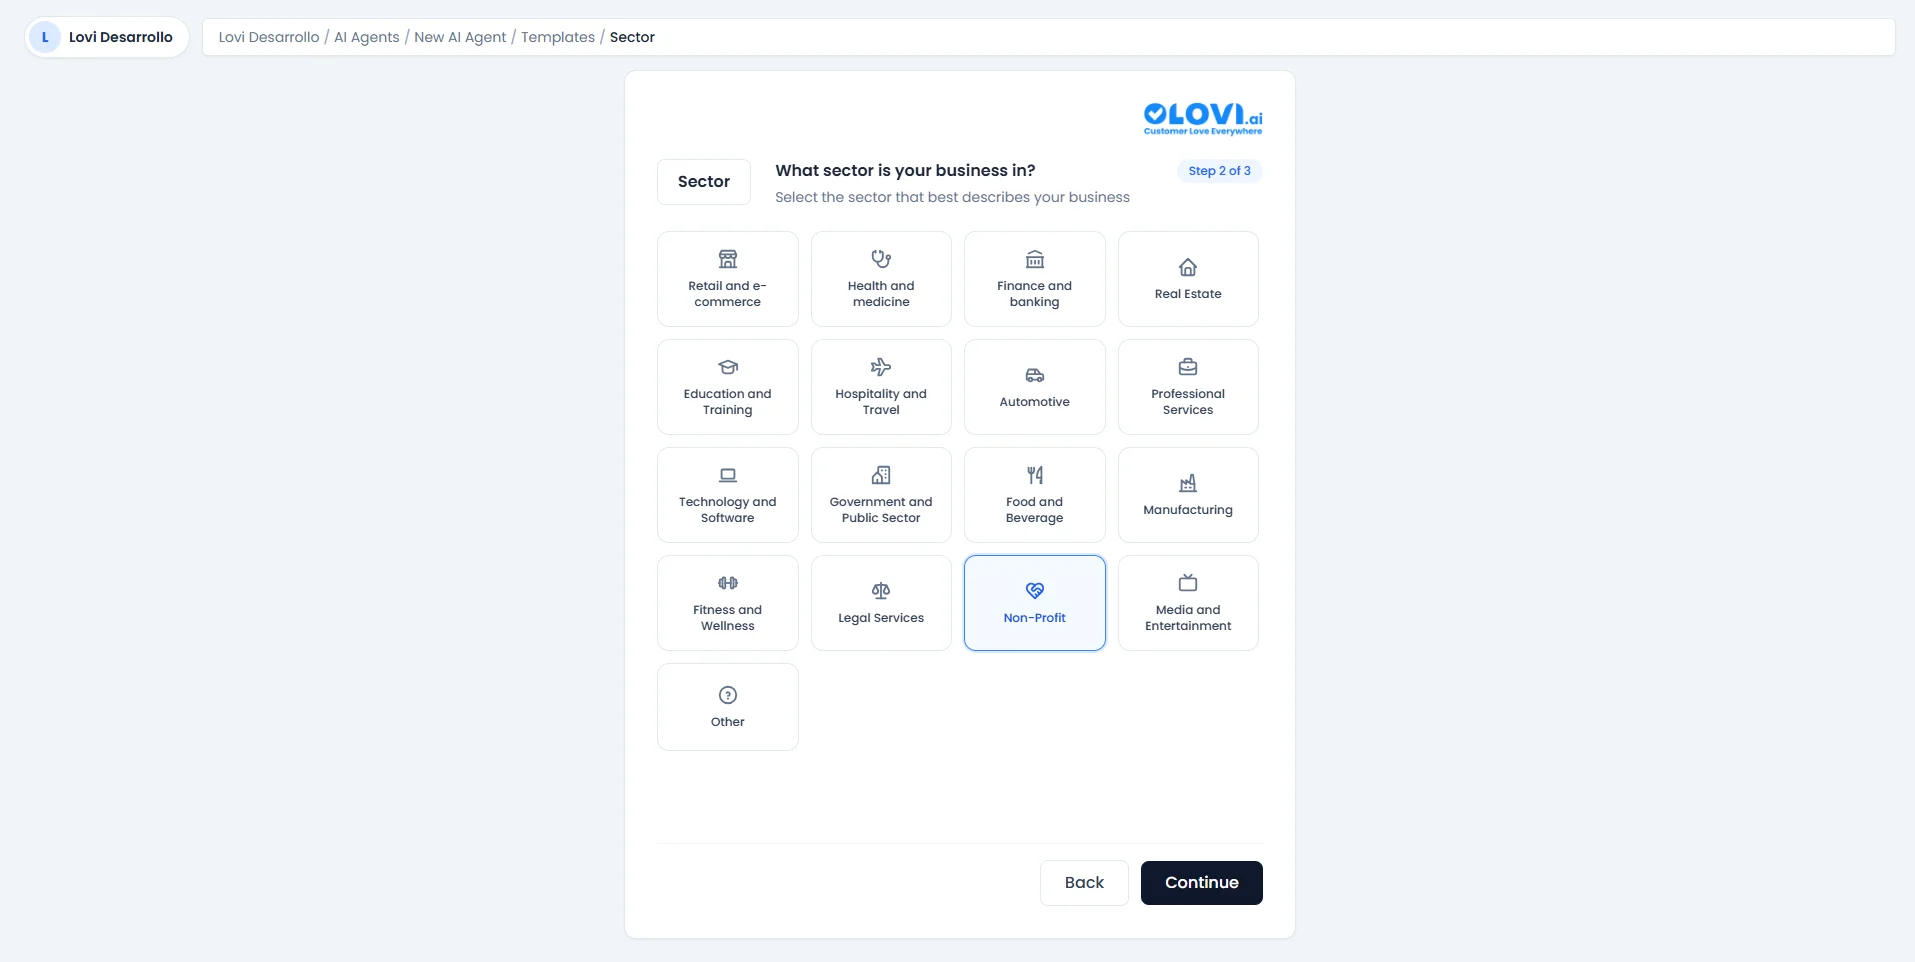 Pick the sector that best describes your business. Available sectors include:
* Retail and e-commerce
* Health and medicine
* Finance and banking
* Real Estate
* Education and Training
* Hospitality and Travel
* Automotive
* Professional Services
* Technology and Software
* Government and Public Sector
* Food and Beverage
* Manufacturing
* Fitness and Wellness
* Legal Services
* Non-Profit
* Media and Entertainment
* Other
Click **Continue** after selecting your sector.
##### Step 3 of 3: Choose Your Use Case
Pick the sector that best describes your business. Available sectors include:
* Retail and e-commerce
* Health and medicine
* Finance and banking
* Real Estate
* Education and Training
* Hospitality and Travel
* Automotive
* Professional Services
* Technology and Software
* Government and Public Sector
* Food and Beverage
* Manufacturing
* Fitness and Wellness
* Legal Services
* Non-Profit
* Media and Entertainment
* Other
Click **Continue** after selecting your sector.
##### Step 3 of 3: Choose Your Use Case
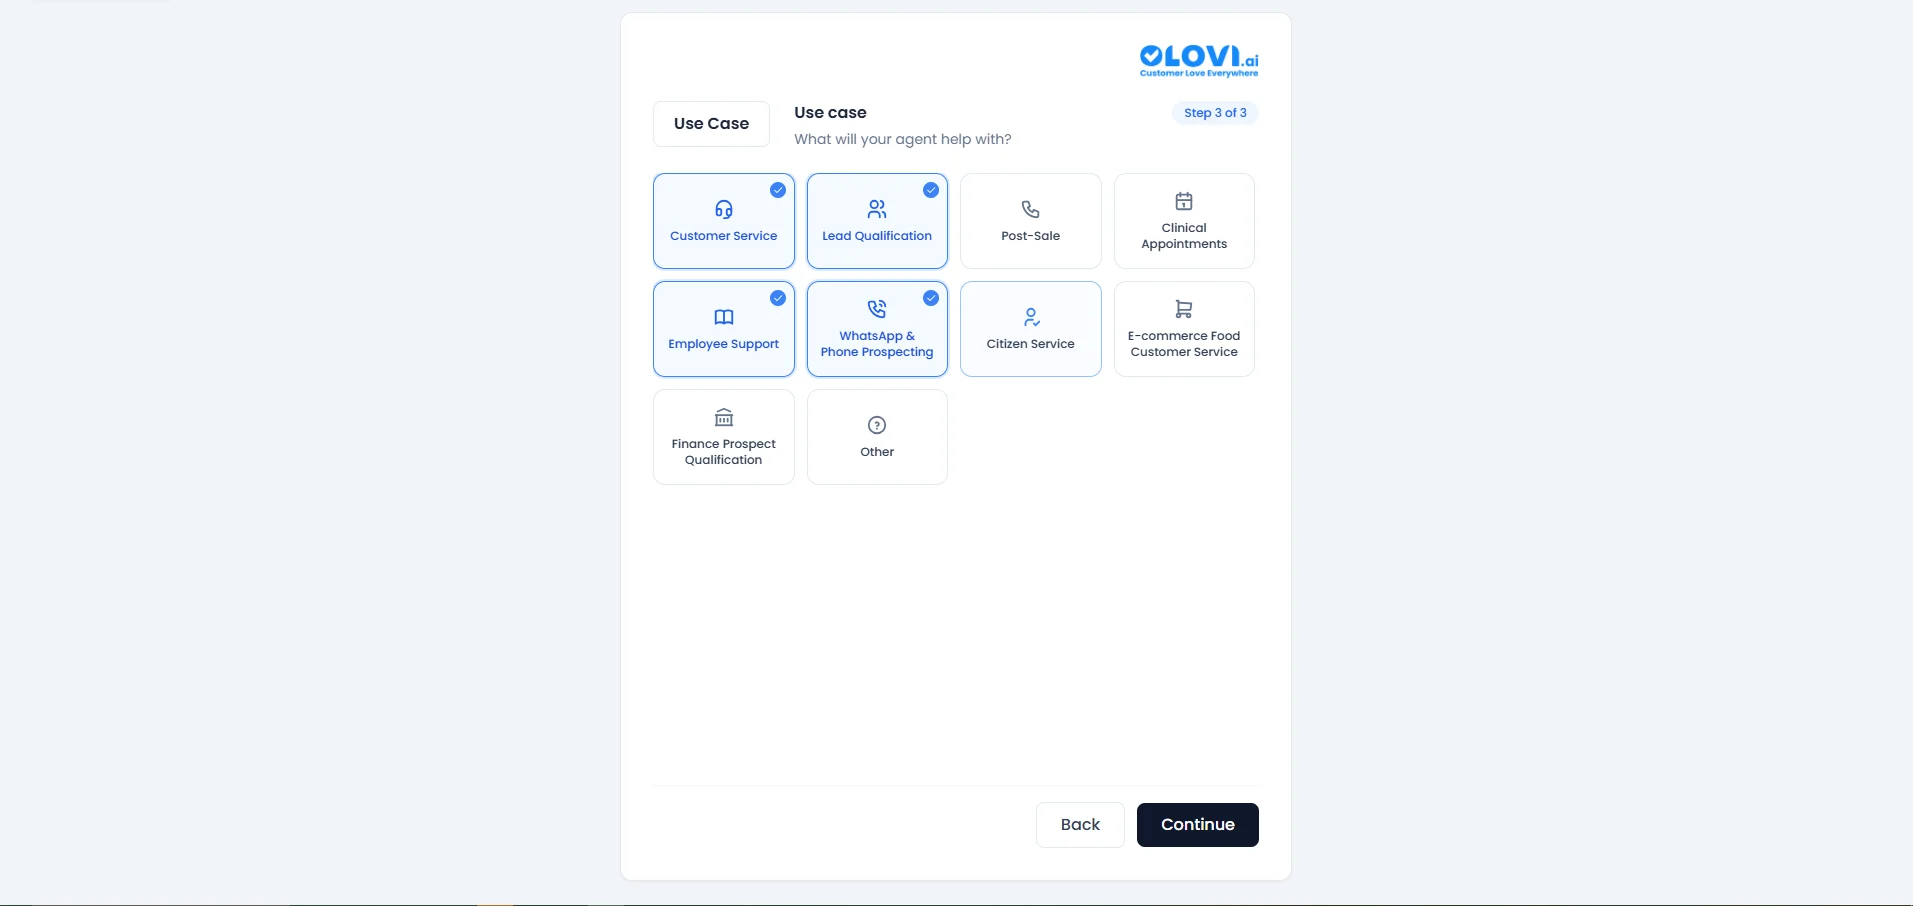 Now tell the wizard **what the agent will help with**. You can select **multiple** use cases — they'll be combined into a single optimised template. Options include:
* Customer Service
* Lead Qualification
* Post-Sale
* Clinical Appointments
* Employee Support
* WhatsApp & Phone Prospecting
* Citizen Service
* E-commerce Food Customer Service
* Finance Prospect Qualification
* Other
Selected use cases appear highlighted with a blue border and a check icon. Click **Continue** when done.
##### Final Step: Agent Configuration
Now tell the wizard **what the agent will help with**. You can select **multiple** use cases — they'll be combined into a single optimised template. Options include:
* Customer Service
* Lead Qualification
* Post-Sale
* Clinical Appointments
* Employee Support
* WhatsApp & Phone Prospecting
* Citizen Service
* E-commerce Food Customer Service
* Finance Prospect Qualification
* Other
Selected use cases appear highlighted with a blue border and a check icon. Click **Continue** when done.
##### Final Step: Agent Configuration
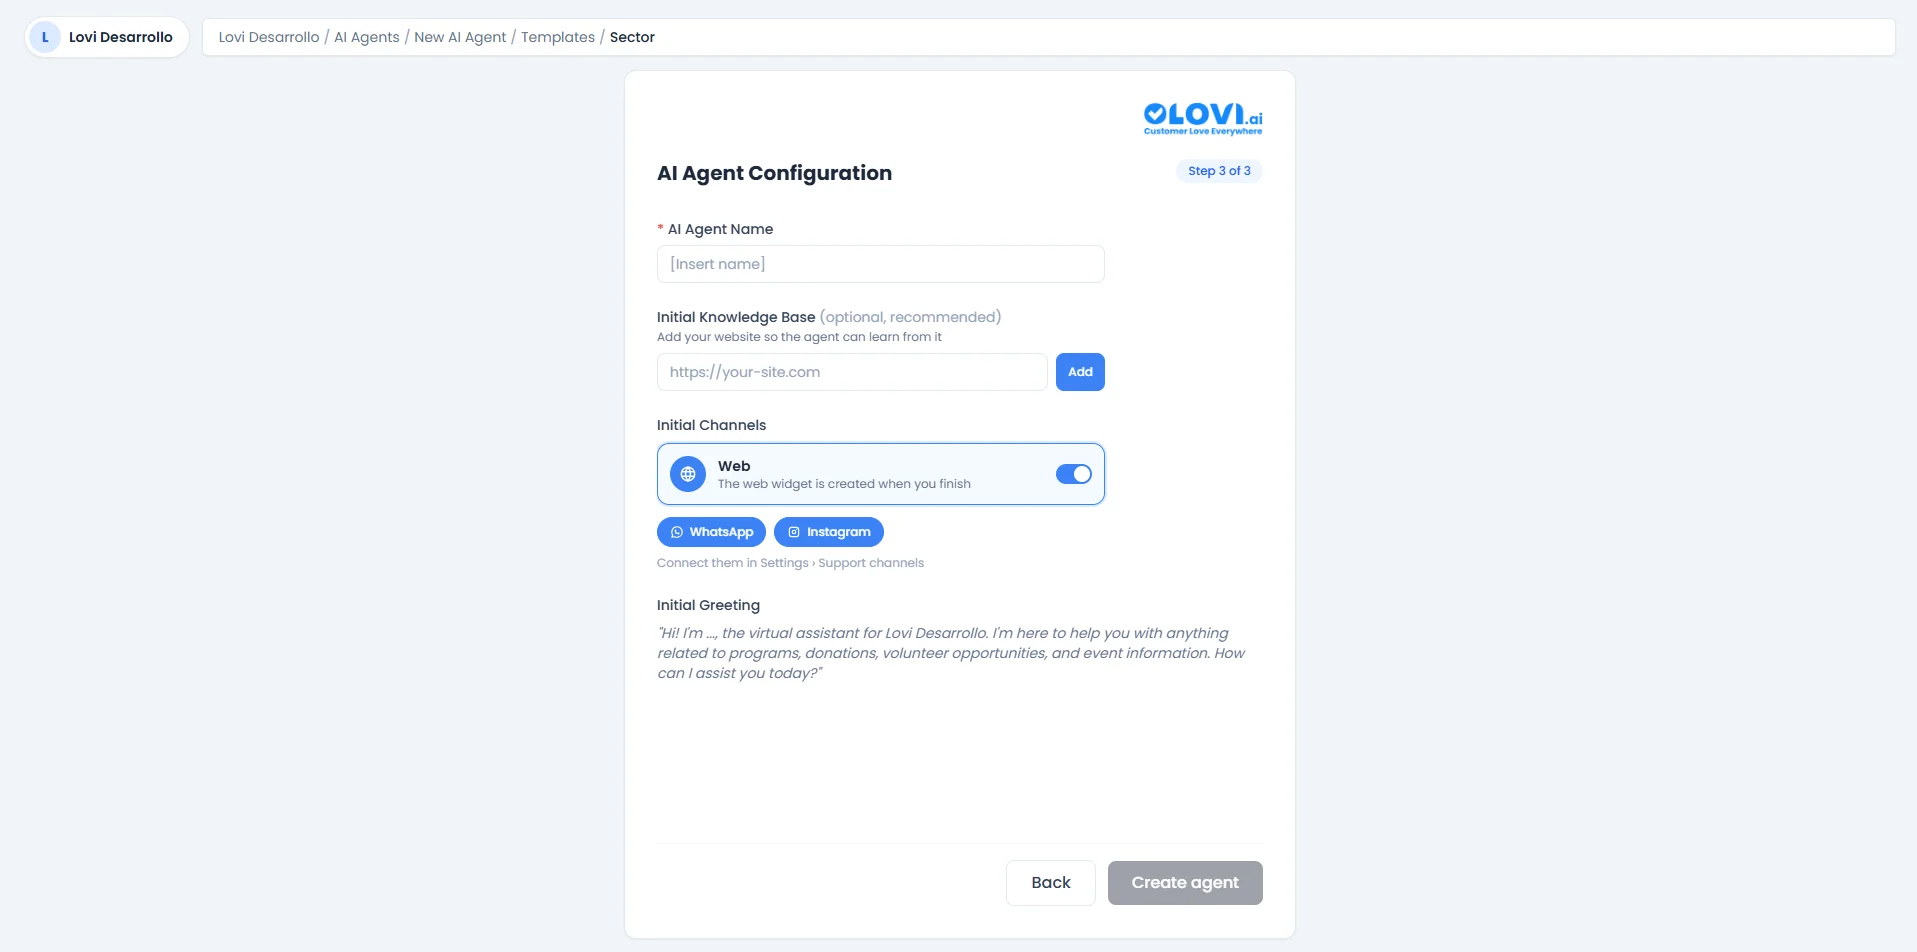 You'll land on the same configuration screen as the blank agent path:
* **AI Agent Name** (required)
* **Initial Knowledge Base** (optional, recommended)
* **Initial Channels** (Web, WhatsApp, Instagram)
* **Initial Greeting**
The difference is that the template has already pre-configured your agent's engine, prompt, and guardrails based on your sector and use case selections. You can always fine-tune these later in the full **Config Agent** module.
Click **Create agent** to finish.
***
### 🎓 What's Next?
Once your agent is created, you'll be inside the full configuration module where you can:
* **[Config Agent](config-agent):** Fine-tune the engine, guardrails, topics, fields, events, voice, and chat settings.
* **[Web Crawlers](Web):** Enrich your agent's knowledge by connecting web data sources.
* **[Websites](Websites):** Manage the websites your agent learns from.
* **[FAQs](FAQS):** Set up frequently asked questions for instant answers.
* **[Documents](Documents):** Upload and manage documents in your knowledge base.
* **[Catalogues](Catalogues):** Connect product catalogues for e-commerce agents.
**Your AI workforce is just a few clicks away! 🤖🚀**
You'll land on the same configuration screen as the blank agent path:
* **AI Agent Name** (required)
* **Initial Knowledge Base** (optional, recommended)
* **Initial Channels** (Web, WhatsApp, Instagram)
* **Initial Greeting**
The difference is that the template has already pre-configured your agent's engine, prompt, and guardrails based on your sector and use case selections. You can always fine-tune these later in the full **Config Agent** module.
Click **Create agent** to finish.
***
### 🎓 What's Next?
Once your agent is created, you'll be inside the full configuration module where you can:
* **[Config Agent](config-agent):** Fine-tune the engine, guardrails, topics, fields, events, voice, and chat settings.
* **[Web Crawlers](Web):** Enrich your agent's knowledge by connecting web data sources.
* **[Websites](Websites):** Manage the websites your agent learns from.
* **[FAQs](FAQS):** Set up frequently asked questions for instant answers.
* **[Documents](Documents):** Upload and manage documents in your knowledge base.
* **[Catalogues](Catalogues):** Connect product catalogues for e-commerce agents.
**Your AI workforce is just a few clicks away! 🤖🚀**