> ## Documentation Index
> Fetch the complete documentation index at: https://docs.lovi.ai/llms.txt
> Use this file to discover all available pages before exploring further.
# Web Widget Configuration
> In this section, you’ll learn how to integrate and customize Lovi’s web widget to perfectly match the design and functionality of your website
 This is the bridge between your clever Agent and your website visitors.
The **Web Widget** is that friendly little bubble in the corner of the screen that says "Hello!". Integrating it is a doddle: you just add a snippet of code to your site, and voilà! Your AI Agent is ready to chat 24/7 without you lifting a finger.
### 🎛️ Overview of Your Widgets
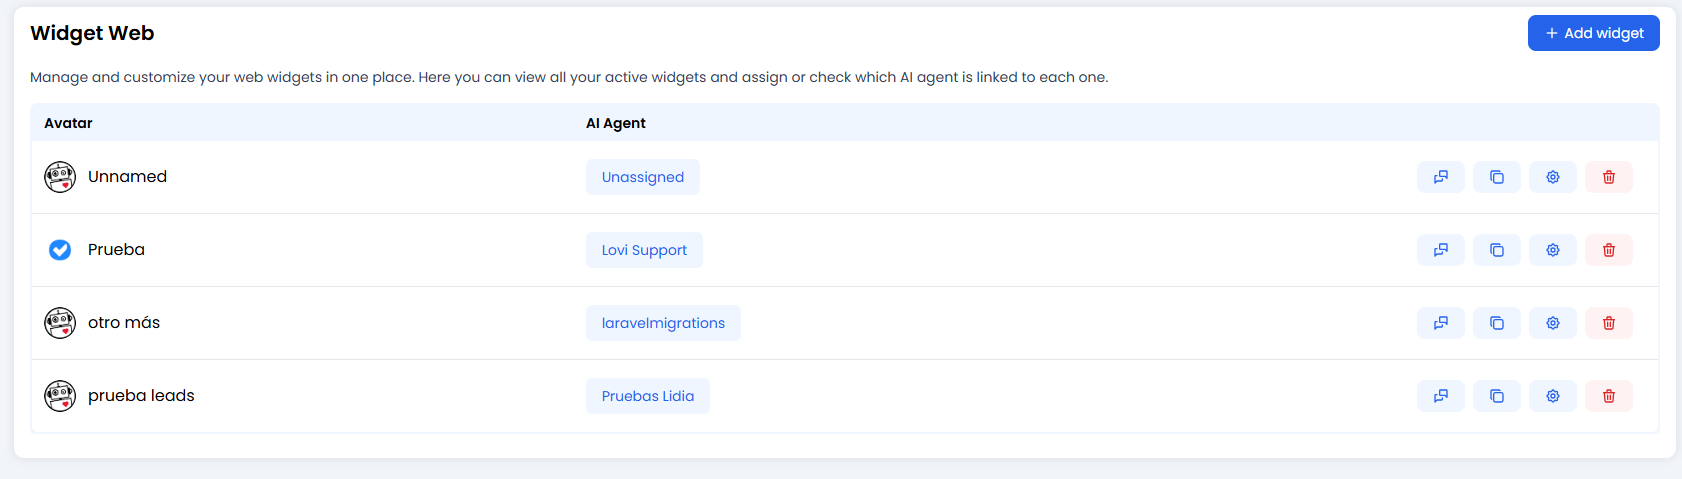
This is your widget command centre. Here you can see every chat bubble you’ve created.
* **Why have more than one?** You might want a "Sales Bot" for your pricing page and a "Tech Support" bot for your help centre. Here you manage them all.
* **Key Actions per Widget:**
* **📋 Copy Script:** Grab the magic code to paste onto your website.
* **⚙️ Configure:** The fun part. Tweak colours, messages, and behaviour (we’ll get to this in a mo).
* **🗑️ Delete:** Bin it if you don't need it.
***
### 🎨 Customising Your Widget (The Art Class)
Click on the **gear icon ⚙️** to enter the configuration lab. Let’s make this widget truly yours.
#### 1. The Basics
* **AI Agent:** Which brain is powering this chat? Select one of your agents from the list.
* **Languages:** Does your site speak English, Spanish, and French? Tell the widget so it doesn't look silly.
#### 2. Floating Message (The Hook 🪝)
Don't let your bot hide! Set a catchy message that pops up above the icon.
* *Boring:* "Chat here."
* *Better:* "Hi there! Need help with your order? 👋"
> **⚠️ Heads up:** Add translations for all your languages. You don’t want Spanish visitors seeing a blank bubble!
#### 3. Look & Feel (Dress to Impress)
* **Header:** Choose what shows at the top. Just a title? Your logo? An avatar of a robot wearing a monocle? It's up to you.
* **Colours:** Use the eyedropper tool 🖊️ to match your brand **exactly**.
* *Main Colour:* The message bubbles and send button.
* *Text Colour:* Make sure it’s readable! Yellow text on a white background is a crime against eyesight.
#### 4. The Gatekeeper: Data Collection Forms 📝
Do you want to know who you’re talking to *before* they start chatting? Enable the **Form**.
* Ask for **Name, Email, or Phone**.
* Make fields "Required" if you’re strict, or "Optional" if you’re chill.
* **GDPR / Privacy:** Add a link to your policy so you stay legal. 👮♂️
#### 5. Smart Data Collection (Advanced 🤓)
This is for the tech wizards. The widget can peek into your website's data (`localStorage`) to see if the user is already logged in.
* **How it helps:** If logged in, the widget can say *"Hello, John!"* instead of asking for his name again.
* **Configuration:** You tell us the "Key" (e.g., `user_email`) and we grab the value automatically.
***
### 🛠️ Extra Tweaks & Layout
Fine-tune the experience:
* **Position:** Left or Right? (Right is standard, Left is for rebels).
* **Full Screen:** Want the chat to take over the whole mobile screen? Toggle this ON.
* **Embed (DOM Element):** Instead of a floating bubble, stick the chat permanently inside a `
This is the bridge between your clever Agent and your website visitors.
The **Web Widget** is that friendly little bubble in the corner of the screen that says "Hello!". Integrating it is a doddle: you just add a snippet of code to your site, and voilà! Your AI Agent is ready to chat 24/7 without you lifting a finger.
### 🎛️ Overview of Your Widgets
This is your widget command centre. Here you can see every chat bubble you’ve created.
* **Why have more than one?** You might want a "Sales Bot" for your pricing page and a "Tech Support" bot for your help centre. Here you manage them all.
* **Key Actions per Widget:**
* **📋 Copy Script:** Grab the magic code to paste onto your website.
* **⚙️ Configure:** The fun part. Tweak colours, messages, and behaviour (we’ll get to this in a mo).
* **🗑️ Delete:** Bin it if you don't need it.
***
### 🎨 Customising Your Widget (The Art Class)
Click on the **gear icon ⚙️** to enter the configuration lab. Let’s make this widget truly yours.
#### 1. The Basics
* **AI Agent:** Which brain is powering this chat? Select one of your agents from the list.
* **Languages:** Does your site speak English, Spanish, and French? Tell the widget so it doesn't look silly.
#### 2. Floating Message (The Hook 🪝)
Don't let your bot hide! Set a catchy message that pops up above the icon.
* *Boring:* "Chat here."
* *Better:* "Hi there! Need help with your order? 👋"
> **⚠️ Heads up:** Add translations for all your languages. You don’t want Spanish visitors seeing a blank bubble!
#### 3. Look & Feel (Dress to Impress)
* **Header:** Choose what shows at the top. Just a title? Your logo? An avatar of a robot wearing a monocle? It's up to you.
* **Colours:** Use the eyedropper tool 🖊️ to match your brand **exactly**.
* *Main Colour:* The message bubbles and send button.
* *Text Colour:* Make sure it’s readable! Yellow text on a white background is a crime against eyesight.
#### 4. The Gatekeeper: Data Collection Forms 📝
Do you want to know who you’re talking to *before* they start chatting? Enable the **Form**.
* Ask for **Name, Email, or Phone**.
* Make fields "Required" if you’re strict, or "Optional" if you’re chill.
* **GDPR / Privacy:** Add a link to your policy so you stay legal. 👮♂️
#### 5. Smart Data Collection (Advanced 🤓)
This is for the tech wizards. The widget can peek into your website's data (`localStorage`) to see if the user is already logged in.
* **How it helps:** If logged in, the widget can say *"Hello, John!"* instead of asking for his name again.
* **Configuration:** You tell us the "Key" (e.g., `user_email`) and we grab the value automatically.
***
### 🛠️ Extra Tweaks & Layout
Fine-tune the experience:
* **Position:** Left or Right? (Right is standard, Left is for rebels).
* **Full Screen:** Want the chat to take over the whole mobile screen? Toggle this ON.
* **Embed (DOM Element):** Instead of a floating bubble, stick the chat permanently inside a `` on your page. Great for "Contact Us" pages.
* **Custom CSS:** If you know code, you can write your own styles here to override ours. The sky's the limit.
***
### 🎨 Custom CSS — The Designer's Guide
Are the preset colours and options too limiting? The **Custom CSS** field gives you full control over the widget's look. Here you can write CSS rules that tweak styles, override default classes, or even add animations.
**Where to find it:** Open the widget configuration (⚙️ icon), expand the **"Custom CSS"** section, and type your code in the text area.
#### ⚙️ How it works under the hood
What you write here isn't magic — it's quite predictable once you get it:
1. Your CSS is saved alongside the widget configuration.
2. When the widget loads on the visitor's website, your CSS is injected as a `