> ## Documentation Index
> Fetch the complete documentation index at: https://docs.lovi.ai/llms.txt
> Use this file to discover all available pages before exploring further.
# Create campaign
> In this section, you can create and configure automated notification or call campaigns, which will be executed by bots using previously created templates.
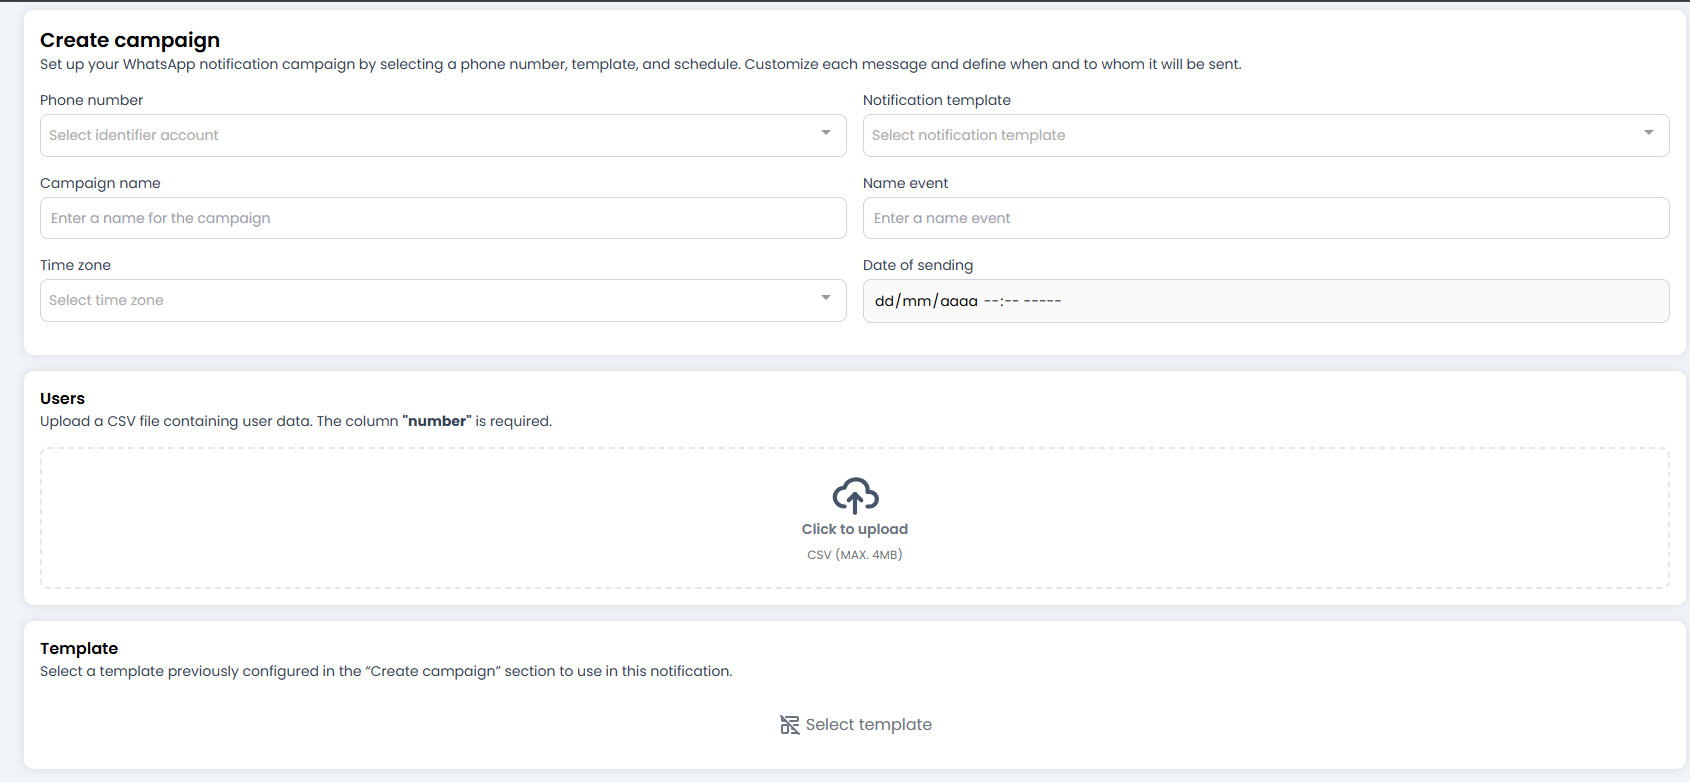 This is where everything comes together: the audience (your CSV), the message (your template), and the exact moment.
This form is your **Launch Centre**. We’ll configure it field by field to make sure the message reaches the right people, at the right time.
***
### 📝 1. Launch Configuration (The Fields)
Fill in these details to define the identity of the campaign:
* **Phone number:** Select the number the messages will be sent from. If you have several (Sales, Support), choose carefully.
* **Notification template:** Choose one of your approved templates.
* *Note:* Only templates that have the green light from Meta (Status: *Approved*) will appear.
* **Campaign name:** A name for your own reference. Something like `Summer_Promo_2024`.
* **Name event:** A technical identifier for the event. Useful if you use webhooks or external integrations to track when this specific campaign is launched.
***
### ⏰ 2. The Time Factor (Scheduling)
Time is relative, but in marketing it is critical.
* **Time Zone:** **Very important!** 🌍 Select the correct time zone. You don’t want to send a “Good morning” message at 3:00 AM because you selected the wrong time zone.
* **Date of sending:** Set the exact date and time of the send.
* The system will schedule the delivery for that precise moment.
***
### 👥 3. The Audience (Users CSV)
This is where you upload the list of **customers** 😄
You must upload a **.CSV** file (maximum 4MB) containing the details of the people you want to contact.
#### ⚠️ The Golden Rule of the CSV:
For everything to work, your Excel/CSV must follow one sacred rule:
1. **`number` column (Mandatory):** There must be a column called exactly `number` containing the phone numbers with the country code (e.g. `447700900123`). Without this column, the system has no idea who to contact.
2. **Variable columns (Optional):** If your template says “Hello `{{name}}`”, your CSV must have a column called `name`. The system will automatically fill in the gaps using the data from each row.
***
### 👁️ 4. Verification (Template)
At the very bottom you’ll see the **Template** section.
It is not editable; it’s just a **visual reminder** so you can confirm: *“Ah yes, this is the template I want to send.”* Make sure it matches what you expect.
***
### ❗ 5. Error: "Params Words Ratio Exceeds Limit" (templates with too many variables)
Occasionally, when saving or validating a template/campaign you may encounter an error similar to the one shown in the screenshot:
This is where everything comes together: the audience (your CSV), the message (your template), and the exact moment.
This form is your **Launch Centre**. We’ll configure it field by field to make sure the message reaches the right people, at the right time.
***
### 📝 1. Launch Configuration (The Fields)
Fill in these details to define the identity of the campaign:
* **Phone number:** Select the number the messages will be sent from. If you have several (Sales, Support), choose carefully.
* **Notification template:** Choose one of your approved templates.
* *Note:* Only templates that have the green light from Meta (Status: *Approved*) will appear.
* **Campaign name:** A name for your own reference. Something like `Summer_Promo_2024`.
* **Name event:** A technical identifier for the event. Useful if you use webhooks or external integrations to track when this specific campaign is launched.
***
### ⏰ 2. The Time Factor (Scheduling)
Time is relative, but in marketing it is critical.
* **Time Zone:** **Very important!** 🌍 Select the correct time zone. You don’t want to send a “Good morning” message at 3:00 AM because you selected the wrong time zone.
* **Date of sending:** Set the exact date and time of the send.
* The system will schedule the delivery for that precise moment.
***
### 👥 3. The Audience (Users CSV)
This is where you upload the list of **customers** 😄
You must upload a **.CSV** file (maximum 4MB) containing the details of the people you want to contact.
#### ⚠️ The Golden Rule of the CSV:
For everything to work, your Excel/CSV must follow one sacred rule:
1. **`number` column (Mandatory):** There must be a column called exactly `number` containing the phone numbers with the country code (e.g. `447700900123`). Without this column, the system has no idea who to contact.
2. **Variable columns (Optional):** If your template says “Hello `{{name}}`”, your CSV must have a column called `name`. The system will automatically fill in the gaps using the data from each row.
***
### 👁️ 4. Verification (Template)
At the very bottom you’ll see the **Template** section.
It is not editable; it’s just a **visual reminder** so you can confirm: *“Ah yes, this is the template I want to send.”* Make sure it matches what you expect.
***
### ❗ 5. Error: "Params Words Ratio Exceeds Limit" (templates with too many variables)
Occasionally, when saving or validating a template/campaign you may encounter an error similar to the one shown in the screenshot:
 The error message typically reads something along the lines of:
> *Invalid parameter - OAuthException - Params Words Ratio Exceeds Limit - This template has too many variables for its length. Reduce the number of variables or increase the message length.*
**What does this mean?**
Meta (WhatsApp) enforces rules about the ratio between the number of variables in a template and the total length of the message. If a template contains too many variables relative to the total word count, validation may fail.
**What to do (quick steps):**
1. Consult the official Business Messaging error codes to understand the exact cause and code: [https://developers.facebook.com/documentation/business-messaging/whatsapp/support/error-codes](https://developers.facebook.com/documentation/business-messaging/whatsapp/support/error-codes)
2. Review the template and reduce unnecessary variables:
* Combine fields in the CSV into a single column before uploading (for example, use `full_name` instead of `first_name` + `last_name`).
* Replace multiple small variables with a single broader variable (for example, `{{1}}` = "John Smith, VIP customer").
3. Increase the length of the message if possible (add non-sensitive descriptive text), to improve the words-to-variables ratio.
4. If you truly need many variables, consider creating several templates with fewer variables each and selecting the most appropriate one per segment.
5. Test the template in a staging environment or with a controlled number of phone numbers before launching to production.
**Practical tips:**
* Avoid using variables for content that is constant and could be written directly in the template.
* Validate the CSV: ensure the variable column names match exactly those referenced by the template.
* Add a short technical note to your template library (for example: "uses fields: full\_name, order\_id") so colleagues preparing CSVs do so correctly.
***
### 🚀 Fire! (Save)
When you click **Save**, the campaign is **Scheduled**.
It won’t go out immediately (unless you selected the current time); instead, it will patiently wait in the queue until the `Date of sending`.
You can go to the **Campaigns** module (the one we saw earlier) to see it with the status “Pending” until its time comes.
**All set! Configure it, upload your list, and wait for the results. 📈**
The error message typically reads something along the lines of:
> *Invalid parameter - OAuthException - Params Words Ratio Exceeds Limit - This template has too many variables for its length. Reduce the number of variables or increase the message length.*
**What does this mean?**
Meta (WhatsApp) enforces rules about the ratio between the number of variables in a template and the total length of the message. If a template contains too many variables relative to the total word count, validation may fail.
**What to do (quick steps):**
1. Consult the official Business Messaging error codes to understand the exact cause and code: [https://developers.facebook.com/documentation/business-messaging/whatsapp/support/error-codes](https://developers.facebook.com/documentation/business-messaging/whatsapp/support/error-codes)
2. Review the template and reduce unnecessary variables:
* Combine fields in the CSV into a single column before uploading (for example, use `full_name` instead of `first_name` + `last_name`).
* Replace multiple small variables with a single broader variable (for example, `{{1}}` = "John Smith, VIP customer").
3. Increase the length of the message if possible (add non-sensitive descriptive text), to improve the words-to-variables ratio.
4. If you truly need many variables, consider creating several templates with fewer variables each and selecting the most appropriate one per segment.
5. Test the template in a staging environment or with a controlled number of phone numbers before launching to production.
**Practical tips:**
* Avoid using variables for content that is constant and could be written directly in the template.
* Validate the CSV: ensure the variable column names match exactly those referenced by the template.
* Add a short technical note to your template library (for example: "uses fields: full\_name, order\_id") so colleagues preparing CSVs do so correctly.
***
### 🚀 Fire! (Save)
When you click **Save**, the campaign is **Scheduled**.
It won’t go out immediately (unless you selected the current time); instead, it will patiently wait in the queue until the `Date of sending`.
You can go to the **Campaigns** module (the one we saw earlier) to see it with the status “Pending” until its time comes.
**All set! Configure it, upload your list, and wait for the results. 📈**